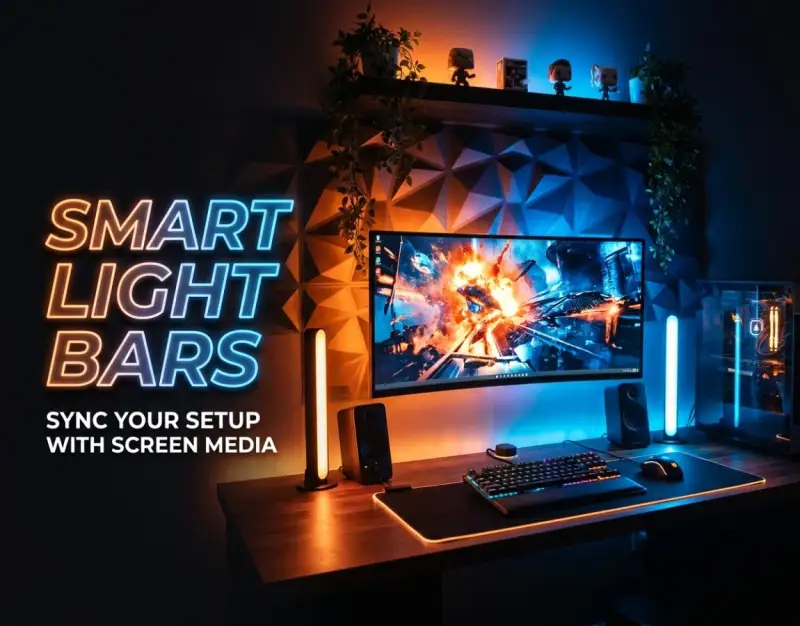
The modern digital workspace has evolved far beyond a functional zone housing a keyboard, a mouse, and a glowing rectangular display. Today, our desks are immersive command centers where we transition seamlessly from intense data-driven analytical work and professional video editing to cinematic evening viewing and high-stakes competitive gaming. Yet, despite monumental leaps in display resolutions, refresh rates, and processor speeds, a fundamental environmental disconnect often persists: the stark contrast between a blinding, high-luminance monitor and a pitch-black or inconsistently lit room. This visual disparity does more than just cause eye strain; it robs your digital media of its intended atmospheric depth, leaving you tethered to a flat, two-dimensional experience.
Enter the era of smart ambient light bars. By mounting intelligent, color-variable LED bars behind your monitor or along the perimeter of your workstation, you can instantly transform your static workspace into a living, reactive canvas. These devices do far more than just cast static colored light—they utilize real-time video capture, advanced desktop software, and sophisticated color-sampling algorithms to dynamically mirror the exact hues, tones, and luminance shifts happening on your screen. Whether a flash of digital lightning illuminates an open-world RPG or warm, golden-hour tones cascade across your video editing timeline, smart ambient light bars bridge the gap between virtual media and physical reality.
In this exhaustive, master-level guide, we will unpack everything you need to know to engineer the ultimate reactive desk ecosystem. From understanding the core optical mechanics of bias lighting to executing step-by-step hardware calibration, troubleshooting latency bottlenecks, and designing an ergonomic environment that protects your vision while elevating your aesthetic, this manual serves as your definitive playbook. Let us dive deep into the science, strategy, and execution of syncing your desk setup with your screen media.
Foundational Principles and Mechanics of Ambient Screen Sync
To truly master smart ambient light bars, one must first grasp the underlying optical and computational principles that govern them. At its core, monitor backlight sync relies on a phenomenon known as bias lighting—the practice of illuminating the wall directly behind a display to reduce the high-contrast ratio between a bright screen and a dark room. Historically, static white or fixed-color bias lights were used strictly for medical imaging and basic eye-strain reduction. Today, however, programmable RGB lighting combined with real-time video processing has turned functional ergonomics into a high-performance art form.
The mechanics of real-time screen synchronization operate through one of two primary pathways: hardware-based HDMI pass-through sync boxes or software-driven desktop clients. Hardware sync boxes sit between your video source (such as a gaming console, Apple TV, or PC) and your monitor, intercepting the HDMI or DisplayPort signal, analyzing the pixel data frame-by-frame, and transmitting corresponding color instructions to the light bars via a microcontroller. Software-driven solutions, by contrast, run natively on Windows or macOS, continuously capturing the frame buffer of your graphics card, processing the edge pixels, and sending data packets to the light bars over Wi-Fi or Bluetooth.
Understanding latency is crucial when evaluating these systems. Motion-to-photon latency—the time it takes for a visual event on your screen to translate into a matching color shift on your wall—must be kept to absolute fractions of a millisecond for fast-paced gaming or action movies. Advanced setups utilize dedicated ambient lighting controllers featuring high-refresh sampling rates (often 60Hz to 120Hz) to ensure that the physical lighting tracks the digital action without discernible lag, creating a seamless, wraparound sensory experience that deepens immersion exponentially.
Hardware Selection and Comprehensive Unboxing Assessment
Designing a world-class RGB desk lighting setup begins long before you plug in your first LED bar; it starts with meticulous hardware selection. Not all ambient lighting products are created equal. Budget solutions often rely on low-density LED strips with limited color zoning, resulting in harsh color banding, muddy blending, and sluggish response times. High-performance smart ambient light bars, conversely, feature individually addressable RGBIC (Independent Control) segments, high color rendering indexes (CRI > 90), and robust mounting ecosystems designed to withstand daily thermal expansion and contraction.
When unboxing and evaluating your light bars, inspect the physical build quality. Look for extruded aluminum housings rather than cheap plastic chassis; aluminum acts as an effective passive heatsink, drawing heat away from the surface-mounted diodes (SMDs) and significantly extending the lifespan of your hardware. Furthermore, evaluate the mounting hardware. Magnetic bases with adjustable multi-angle pivots allow you to angle the light beam precisely against the wall, ensuring you achieve optimal diffusion rather than a harsh, direct laser-like beam.
Before committing to a permanent installation, map out your desk's physical architecture. Consider power management, cable routing, and peripheral placement. A truly immaculate desk setup requires forethought regarding cable clutter. As you organize your power bricks, monitor cables, and light bar power adapters, pairing your visual upgrade with organizational tools like Desk Drawer Organizers: 4 Modular Trays That Conquer Desktop Clutter ensures that your workspace remains clean, professional, and entirely free of tangled wire nests both above and below the surface.
Step-by-Step Installation and Physical Placement Strategy
Achieving a professional, studio-grade screen synchronization effect is heavily dependent on precise physical placement. If your light bars are positioned incorrectly, the light throw will be uneven, creating distracting hot spots on your wall rather than a smooth, expansive aura that seamlessly extends your display.
Calculating Optimal Mounting Distance From the Wall
The distance between the back of your monitor and the mounting wall dictates the width and softness of your ambient light beam. If your monitor is pushed flat against a wall, the light bars will produce narrow, intense circles of color. For an optimal immersive gaming setup, position your monitor approximately 4 to 6 inches (10 to 15 centimeters) away from the wall. This gives the LED emitters enough spatial runway to diffuse their beams, blending adjacent color zones into a uniform, glowing halo.
Securing the Light Bars to the Monitor Chassis
Most premium smart ambient light bars come equipped with heavy-duty 3M VHB adhesive brackets or specialized monitor-mount clips. Thoroughly clean the back of your monitor chassis with isopropyl alcohol to remove dust, oils, and manufacturing residues before applying any adhesive. Mount the light bars vertically on the left and right rear corners of the display, approximately two-thirds of the way up the chassis. This elevated placement ensures that the projected light envelopes your peripheral vision without shining directly into your eyes or reflecting off the glass surface of your monitor.
Power Routing and Controller Integration
Concealment of power and data cables is the hallmark of a masterclass desk build. Route the USB power cables or dedicated DC power adapters downward along the central monitor arm or vertical stand, securing them with low-profile clips. Connect the light bars to their designated sync controller or smart hub, ensuring that the controller itself is tucked neatly out of sight beneath the desk or behind the monitor riser. Double-check all polarity and connection pins before plugging the master power supply into a surge-protected power strip.
Software Calibration and Advanced Screen-Mapping Configurations
Once your hardware is physically secured and powered, the real magic begins: software calibration and screen mapping. Without proper configuration, your ambient lights will display arbitrary colors that bear no relation to the media playing on your display, completely undermining the purpose of monitor backlight sync.
Installing and Pairing Desktop Synchronization Clients
Download the official desktop control suite provided by your hardware manufacturer (or open-source alternatives like OpenRGB or Prismatik if utilizing DIY microcontroller setups). Connect your lighting controller to your PC or Mac via Wi-Fi (typically on a 2.4GHz band for stable local network communication) or via a direct USB data link. Within the software dashboard, pair your device, assign a custom device name, and verify that the firmware is updated to the latest stable release to eliminate packet-loss bugs.
Configuring the Virtual Screen Capture Matrix
The core of screen synchronization lies in defining how the software "sees" your display. Navigate to the ambient mode or video-sync tab within your desktop client. You will be presented with a virtual grid or border layout representing your monitor. Drag and drop the corresponding light bar zones to match their physical orientation—assigning the left bar to capture the left edge of your screen, the right bar to capture the right edge, and top bars (if applicable) to capture the upper threshold.
Tuning Saturation, Brightness, and Response Curves
Default software settings are rarely optimized for every lighting environment. Enter the advanced adjustment panel to fine-tune your visual profile:
- Brightness Limiting: Cap the maximum output to prevent blinding flashes during sudden white-screen transitions in movies or games.
- Saturation Boost: Increase color saturation slightly if your wall color is off-white or cream, ensuring vibrant, true-to-source color representation.
- Smoothing / Transition Delay: Adjust the interpolation slider. A faster response is ideal for fast-paced shooters, while a smoother, slower fade creates a cinematic mood for RPGs and video editing.
Ergonomic Optimization and Visual Health Considerations
While RGB desk lighting introduces an undeniable layer of aesthetic brilliance and immersive depth, it is vital to balance visual flair with long-term physiological health. Staring at glowing screens and high-contrast environments for extended periods can take a toll on your musculoskeletal and visual systems if proper ergonomic fundamentals are ignored.
Mitigating Eye Fatigue Through Dynamic Bias Lighting
The primary medical benefit of installing smart ambient light bars behind your monitor is the reduction of visual fatigue. In a dark room, your eyes' irises dilate to accommodate the overall low ambient light. When you gaze at a bright monitor displaying a white webpage or a blinding in-game explosion, your pupils must rapidly constrict, causing muscular strain within the eye. By casting a ambient halo that matches the average luminance of your screen, the transition is softened, protecting your retinas and preventing end-of-day tension headaches.
Aligning Lighting with Physical Ergonomics and Posture
An immersive setup must never compromise your physical posture. As you adjust your seating position, monitor height, and peripheral layout to maintain neutral wrist and neck angles, ensure that your lighting equipment does not obstruct your range of motion. Furthermore, as you spend hours immersed in your newly lit digital environment, maintaining proper wrist support is paramount. Incorporating supportive accessories like Ergonomic Wrist Rests: 4 Supportive Pads for Pain-Free Typing Sessions guarantees that your hands, wrists, and forearms remain completely relaxed, preventing repetitive strain injuries during marathon work or gaming sessions.
Managing Ambient Room Lighting and Glare
To maximize the efficacy of your smart ambient light bars, eliminate competing light sources in your room. Overhead ceiling fixtures or uncovered windows facing your monitor will wash out the ambient glow and introduce severe specular glare onto your screen surface. Utilize blackout curtains, dim overhead recessed lighting, and let your custom smart ambient ecosystem serve as the primary architectural illumination source within your workspace.
Real-World Case Studies and Scenario Analysis
To fully understand the practical impact of smart ambient light bars, let us examine two contrasting case studies representing different approaches to desk setup optimization.
Case Study A: The High-Performance Gaming Command Center
Marcus, a competitive esports enthusiast and evening streamer, struggled with eye fatigue and a sterile workspace aesthetic. His setup featured a high-refresh-rate 1430p monitor mounted against a plain white wall, illuminated only by a harsh desk lamp. Marcus integrated a dual-bar smart RGBIC lighting kit paired with desktop screen-mirroring software set to an ultra-fast 120Hz sampling rate.
The Result: By syncing his display directly with high-paced tactical shooters, the peripheral flashes of muzzle fire and environmental explosions extended organically onto the wall. Not only did this drastically increase his perceived field of view and sensory immersion, but his reported post-gaming eye strain dropped by over 60% within the first week of operation.
Case Study B: The Pitfalls of Poor Calibration and Cheap Hardware
Conversely, Sarah—a freelance graphic designer—purchased a cheap, non-addressable USB LED strip from a generic online marketplace. The strip featured only three static color zones controlled by an infrared remote. Because the lights could not dynamically sample her design software or video timeline, the colors clashed violently with the color-accurate Adobe sRGB color grading on her monitor, distorting her perception of hues and whites.
The Lesson Learned: For creative professionals, static or poorly calibrated ambient lighting can actively ruin professional color work. Upgrading to color-accurate smart ambient light bars with software bypass options during color grading tasks is non-negotiable for anyone who requires absolute visual fidelity.
Critical Mistakes and How to Avoid Them
Even seasoned tech enthusiasts occasionally stumble when configuring advanced smart home and desktop lighting ecosystems. Avoiding these five costly mistakes will save you hours of frustration and ensure your setup performs flawlessly.
- Ignoring Wall Color Interferences: Mounting smart light bars against a dark gray, textured, or vividly colored wall will drastically distort the projected hues. Countermeasure: Stick to neutral white, light gray, or matte off-white wall finishes, or use your lighting software's color calibration wizard to compensate for wall pigmentation.
- Overloading USB Power Ports: Plugging high-density RGBIC light bars directly into low-amperage USB ports on the back of a monitor often results in flickering, color dropouts, or controller resets. Countermeasure: Always power your light bars using a dedicated high-output wall adapter or an independent powered USB hub.
- Setting Transition Speeds Too Fast: Configuring your software capture rate to maximum sensitivity without smoothing algorithms creates a jittery, strobe-like effect that induces nausea and visual distraction. Countermeasure: Enable a subtle transition fade (between 100ms and 300ms) to blend color transitions smoothly.
- Failing to Isolate Network Latency: Relying on congested Wi-Fi channels for wireless desktop-to-light synchronization causes noticeable stuttering and lag. Countermeasure: Reserve a dedicated 2.4GHz IoT network band or connect your lighting hub via a wired USB bridge where available.
- Neglecting Cable Strain Relief: Allowing heavy power bricks and dangling cords to pull downward on monitor-mounted light bars will weaken adhesive bonds over time, resulting in dropped hardware. Countermeasure: Secure all cables firmly to your monitor stand using zip ties or mounting clips, leaving zero dead weight pulling on the light bars.
Comprehensive Comparison: Ambient Lighting Technologies
To help you select the ideal configuration for your workflow, examine the comparative matrix below detailing the performance, cost, and complexity of various desktop lighting approaches.
| Lighting Technology | Sync Method | Visual Accuracy | Latency | Setup Complexity |
|---|---|---|---|---|
| Static LED Strips | Manual Remote / Fixed Color | None (Constant) | Zero | Very Low |
| Sound-Reactive Music Bars | Built-in Microphone / Audio FFT | Audio-Dependent Only | Low (Real-time Audio) | Low |
| Software-Driven USB Light Bars | Desktop Capture Client (GPU Hook) | High (Pixel-Accurate) | Low to Moderate (10-30ms) | Moderate |
| Hardware HDMI Sync Box | In-line Video Pass-Through Processor | Ultra-High (Frame-Accurate) | Near Zero (<5ms) | Advanced |
Frequently Asked Questions (FAQ)
Do smart ambient light bars require a dedicated PC to run screen sync?
Most advanced software-driven smart ambient light bars require an active host computer (running Windows or macOS) with the manufacturer’s desktop client installed to process real-time screen capture. However, if you are looking to sync console gaming systems (such as a PlayStation or Xbox) or streaming devices (like an Apple TV or Roku), you will need a hardware-based HDMI sync box that intercepts the video signal independently of a computer.
Will ambient light bars interfere with color-accurate photo or video editing?
Yes, if left in dynamic screen-sync mode while you are working in color-critical applications like Adobe Premiere Pro, DaVinci Resolve, or Photoshop, the shifting wall colors will heavily skew your perception of color grading and white balance. Fortunately, most modern smart lighting suites allow you to instantly toggle screen sync off and switch to a static, high-CRI 6500K neutral daylight profile specifically designed for professional creative work.
Can I control my desk light bars with smart home assistants like Alexa or Google Home?
The vast majority of premium smart ambient light bars feature native integration with major smart home ecosystems, including Amazon Alexa, Google Assistant, and Apple HomeKit (via Matter or dedicated bridges). This allows you to control power states, adjust brightness levels, and trigger custom ambient scenes using simple voice commands or automated routines tied to your daily schedule.
What is the difference between RGB and RGBIC smart light bars?
Standard RGB light bars illuminate the entire bar in a single uniform color at any given moment. RGBIC (Independent Control) light bars feature advanced integrated microchips that allow multiple distinct color segments to be displayed simultaneously along a single physical bar. This advanced segmentation is what enables smooth, multi-colored gradients that accurately mirror complex, multi-zone imagery on your monitor screen.
How do I clean and maintain my monitor-mounted light bars?
Dust accumulation on LED lenses and diffusion panels can significantly dull light output and alter color temperature. To maintain peak performance, power down and unplug your light bars, then gently wipe the exterior housing and diffuser panels with a dry, anti-static microfiber cloth. Avoid using harsh chemical solvents, liquid sprays, or abrasive paper towels that could scratch the optical diffusion material or damage the underlying surface-mounted electronic components.
Strategic Roadmap and Final Takeaway
Integrating smart ambient light bars into your workspace is far more than an exercise in superficial aesthetic enhancement; it is a holistic upgrade to your digital ergonomics, sensory immersion, and cognitive well-being. By bridging the luminous gap between virtual screen media and your physical room environment, you eliminate eye strain, elevate your creative focus, and transform casual viewing into an arresting cinematic experience.
As display technologies continue to advance toward higher peak brightnesses and HDR standards, the role of reactive ambient illumination will only grow more vital in modern workspace engineering. To begin your journey, assess your physical desk layout, invest in high-CRI, addressable RGBIC hardware, and follow the calibration roadmap outlined in this guide. Take control of your digital environment today, and experience your screen media the way it was truly meant to be seen.
Be the first to share a gentle reflection on this story.